
Jeep Molle Door Cards Install Guide

Jeep Molle Door Cards Install Guide
Jeep Molle Door Cards Install Guide
Welcome to your step-by-step guide to installing Dirt Tech Labs MOLLE Door Panels. Let's turn your vehicle's doors into a customizable gear-hanging powerhouse.
What you'll need:
-
The hardware provided in your kit
-
A knife
-
An impact driver with a Phillips head screwdriver bit
Installation Steps:
Step 1: Remove the Door Netting
Firmly grasp the netting and pull upwards to detach the wire from the door recess.
Use the knife to carefully trim any netting that remains stuck in the door.
Step 2: Cut the Elastic Band
Locate the thick top elastic band on each side of the net and cut through it. This will fully free up the door space.
Step 3: Clean the Door
Take this opportunity to clean the door thoroughly. A clean surface ensures better adherence and a neater appearance.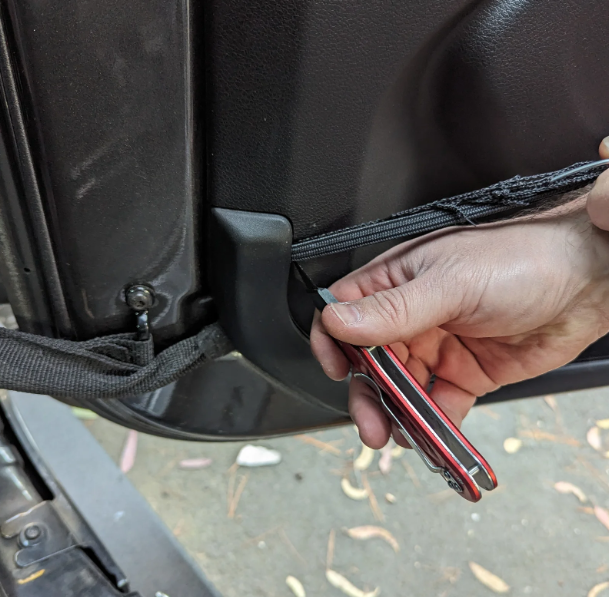
Step 4: Install the MOLLE Door Panel
Place the MOLLE door panel against the door, aligning it with the door’s panel.
Insert and partially tighten a couple of the supplied screws to secure the panel in place.
Proceed to install the remaining screws, ensuring the panel is flat and secure against the door.
And there you have it! Your doors are now equipped with a rugged, functional upgrade that's ready for any adventure. Load them up with gear, and hit the trails or the streets in style.
Enjoy your new MOLLE Door Panels and the added functionality they bring to your rides!

About Joshua Taylor
I am an experienced automotive photographer with a keen interest in offroad, rally and all kinds of motorsports.